
1. Introduction
CatGrips speed jump ropes are engineered for high-intensity training: CrossFit, boxing, double-unders, HIIT cardio… Precision ball bearings and ultralight steel-coated cables deliver fast, consistent rotation with minimal drag, giving you the control you need to push your limits safely.
This guide covers everything you need to set up your rope correctly, replace the cable when needed, and get the most out of it for years to come.
2. Adjusting cable length
Correct cable length is the single biggest factor between a smooth session and constant trip-ups. The right length depends on your height and skill level.
Standard method
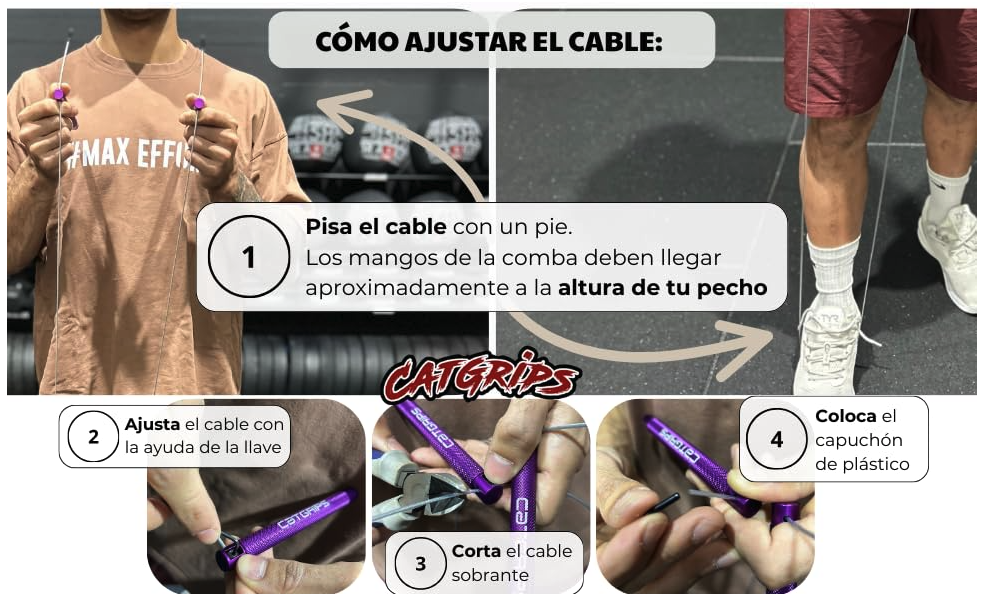
- Step on the centre of the cable with one foot, pressing it firmly to the floor.
- Hold both handles and bring them straight up alongside your body.
- The ideal length is when both handles reach approximately chest height.
- If the handles fall below your chest, the cable is too short.
- If they rise above your shoulders, the cable is too long — shorten it.
Beginner tip
If you are just starting out, leave the cable slightly longer to give yourself extra margin. As your technique improves, gradually shorten it until you find the perfect length.
3. Replacing the cable
The cable can be replaced at home in minutes using the Allen key included in the bag. Replace it when you notice wear, kinks, or simply want to try a different cable thickness.
- Loosen the screws — Using the included Allen key, loosen the screws at the top of each handle.
- Remove the old cable — Pull the cable gently from one handle until it slides out completely.
- Thread the new cable — Feed the new cable through both handles until the ends protrude from the top of each.
- Set the length — Stand on the centre of the cable and hold both handles up. Adjust until the handles reach chest height.
- Secure the cable — Tighten the screws firmly on both handles to lock the cable in place.
- Trim the excess (if needed) — Cut any excess cable with pliers or strong scissors, leaving 1–2 cm protruding to refit the end cap.
- Test and train! — Spin the cable by hand to confirm it rotates freely. You're ready to jump!
4. Silver PRO model — Special adjustment
Silver PRO onlyThe Silver PRO rope features a different adjustment system at one end of the cable. Instead of the crimped end found on the standard model, you will find an Allen screw that allows you to fine-tune the length without cutting the cable.
- Find the screw end — Inspect both cable ends. One will have an Allen screw instead of the usual crimped finish: that is the adjustable end.
- Loosen the screw — Use the included Allen key to loosen the screw at that end until the cable can slide freely.
- Adjust the length — Using the standard method (standing on the centre), slide the cable in or out until you reach the desired length.
- Lock the screw — Once in the correct position, tighten the Allen screw firmly to hold the cable in place.
- Trim the excess (recommended) — Cut the surplus cable leaving only 1–2 cm beyond the screw, just enough to refit the protective end cap.
- Replace the end cap — Slide the cap back over the cable end to protect both the cable and the screw from impacts.
The length-adjustment method is identical for both models: standing on the cable with one foot, the handles should reach chest height.
5. Maintenance and care
- Store the rope loosely coiled in wide loops. Avoid bending the cable at sharp angles.
- Wipe the cable with a dry cloth after each training session.
- Periodically check the fixing screws on both handles to ensure they are tight.
- Keep the rope away from prolonged exposure to direct sunlight or intense heat.
- If the cable develops kinks or twists, work them towards the ends before use.
- Replace the cable if you notice visible wear, cuts, crush marks, or permanent bends.
- Bearings need no routine lubrication, but if rotation feels stiffer than usual, a drop of light oil will restore smoothness.
Official spare part
CatGrips replacement cable
Ultralight coated steel cables, compatible with all CatGrips models. Available in multiple thicknesses to match your level.
Cable 2.4 mm — Anti-tangle coating
The most durable. Special coating prevents tangling and withstands impact with the floor.
View on AmazonMost popularCable 2.0 mm — Standard coating
Perfect balance between speed and durability. The everyday training favourite.
View on AmazonCompetitionCable 1.5 mm — Bare ultralight steel
No coating. Maximum speed and spin. Designed for competition and advanced athletes.
View on Amazon